A S’more Layer Cake is the perfect birthday or special occasion cake!
Hey there! You may be wondering what this recipe for S’more Layer Cake is doing on a paleo-ish food blog. Well…. it dates back to when I wasn’t a paleo-ish blogger, and it’s one of our favorites.
Eventually I’d like to clean it up and make it (at least) gluten and dairy-free, but in the meantime it’ll stay and have a home here on my blog as totally-worth-it recipe we’d indulge in.


If you’ve been reading my blog for a while you’ll know that even though we’re pretty clean eaters, we like to indulge on birthdays. We also take our birthday cakes very seriously.
Birthday cake planning is talked about year-round, and the girls have cakes planned out until they’re tweens.
Luckily girls are fickle, so I don’t have to make my shopping list until a couple weeks beforehand, which is usually when they change their minds.
My marshmallow-obsessed middle child turned four over the holiday weekend, and for the past month or so she’d been requesting a s’more birthday cake.
Just a couple weeks after she’d made her decision, I got Deb Perelman’s book, The Smitten Kitchen Cookbook, in the mail.


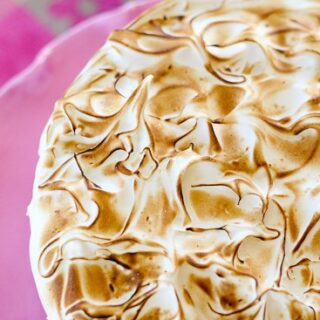
See that cake up there? It’s Deb’s S’more Layer Cake. I almost died when I saw it. No, really.
Decision made.
This week we also tried those tacos (spaghetti squash and beans!) as well as her vinegar slaw with cucumbers and dill. Those were especially good after the rich, Thanksgiving food we’d been eating all weekend.
Nothing like a bowl of lightly pickled cabbage to set you back on track. I actually loved it, though, and it was a surprisingly good addition to those tacos.


Alright, back to the cake. I packed my kitchen torch and a number four candle and made the cake up at my parents house over the weekend. My little miss was so excited!
We were, too. That cake was TO. DIE. FOR. The cake part tasted just like graham crackers, and that meringue smelled just like roasted marshmallows when it was torched.
*swoon*
The only thing I’d do differently is make more frosting (I didn’t feel like it made enough to make those dollop things in Deb’s photo), and use dark chocolate in the filling instead of milk chocolate.


The Smitten Kitchen Cookbook is pretty amazing, guys. That was kind of a given, though. Smitten Kitchen was one of the first food blogs I started reading, and Deb always delivers. Always.
A few food bloggy friends also felt that way, too! For more gushing over this book and some rockstar recipes go to…
The Roasted Root for Pancetta, White Bean & Chard Pot Pie
Eat Your Heart Out for Plum Poppyseed Muffins (plus its Stephie’s birthday today! Happy Birthday Stephie!)
If you make one of my recipes, be sure to post it on social media and tag me at @perrysplate or #perrysplate so I can send you some love!

S'more Layer Cake
If you love s'mores, then this cake is a MUST BAKE. And if you don't have a kitchen torch, ask for one for your birthday. And then make this cake. It's absolutely fantastic with toasted marshmallow frosting.
Ingredients
Cake Layers
- 16 tablespoons unsalted butter (2 sticks)
- 2 cups all-purpose flour
- 2 cups honey (not cinnamon-sugar topped) graham-cracker crumbs, finely processed to a powder (about 14 2 1/2-by-4 7/8-inch sheets)
- 2 teaspoons baking powder
- 3/4 teaspoon baking soda
- 3/4 teaspoon table salt
- 1/2 teaspoon ground cinnamon
- 2/3 cup granulated sugar
- 1 cup dark brown sugar
- 4 large eggs, at room temperature
- 2 cups buttermilk, well shaken (or 1 1/3 cups milk and 2/3 cup sour cream)
Filling
- 1/2 pound milk chocolate, chopped small
- 3/4 cup heavy cream
- 2 pinches of salt
Frosting
- 4 large egg whites
- 1 cup granulated sugar
- 1/4 teaspoon cream of tartar
- 1 teaspoon pure vanilla extract
Instructions
- Preheat your oven to 350 degrees F.
- Butter two 9-inch round cake pans, and line them with circles of parchment paper, then butter or coat with nonstick cooking spray.
- In a medium bowl, whisk together flour, graham-cracker crumbs, baking powder, baking soda, salt, and cinnamon. Set aside.
- In a large mixing bowl, cream butter and sugars together until light and fluffy. Add eggs one at a time, scraping the bowl down after each addition.
- Add a third of the dry ingredients, then half the buttermilk, a third of the dry ingredients, the remaining buttermilk, and then the remaining dry ingredients, mixing between additions until combined. Scrape down bowl, and mix again briefly if needed.
- Divide batter between prepared cake pans, smoothing tops.
- Bake until a toothpick inserted into the center comes out clean, about 30-35 minutes. Cool in pan on rack, then run a knife between the cake edges and pans before inverting each layer on a rack, discarding the parchment paper, and flipping back upright onto a rack. Let cool completely, a process you can speed up in the fridge.
- Make the filling: Place the chocolate in a heatproof bowl. Combine the heavy cream and salt in a small saucepan, and bring to a simmer.
- Pour over the chocolate, and let sit for 1 minute, then whisk until smooth. Set bowl over another bowl filled with ice water, and stir it until it firms up to a spreadable consistency. You can also let it cool down in the fridge, stirring it from time to time so it thickens evenly.
- Prepare the cake: Arrange a single cake layer on a serving platter or cake stand. For a neat-looking cake, use a long serrated knife to level the top gently, taking off only the domed part (which shouldn't be much); place scraps in a bowl where husbands and other housemates can enjoy the preview.
- Spread chocolate thickly over bottom layer. Place the top layer over bottom layer. Once again, for a neater appearance, you can level the top off the cake in the same manner, but I won't tell anyone if you don't share the scraps. Baking is exhausting work, after all.
- Make the frosting: Place egg whites, granulated sugar, and cream of tartar in the heatproof bowl of an electric mixer. Set over a saucepan with simmering water. Whisk constantly until sugar is dissolved and whites are warm to the touch, about 3 minutes.
- Transfer the bowl to an electric mixer fitted with the whisk attachment, and beat, starting at low speed, gradually increasing to high, until stiff, glossy peaks form, 4-7 minutes. Add vanilla, and mix until combined. You'll want to use this immediately.
- Frost the cake: Spread a thin layer of the frosting over the top and sides, covering all of the crumbs (and binding them to the cake). Transfer the cake to the fridge for 5 or 10 minutes, to let it set a bit, then generously coat the top and sides with additional frosting.
- Pipe the remaining frosting (if you have it) in marshmallow-like dollops decoratively over the top. (I didn't do this part, so I have no wisdom to share.)
- With a kitchen torch on a low setting, lightly brown the top, creating a toasted-marshmallow effect.
Notes
Nat's Notes:vI should have used parchment in my pans, but I didn't. A few chunks came out of the tops, but with the fluffy frosting, you'd never know. Honestly, I secretly like when it does that because I get to taste more of the cake.
Disclaimer: I received a free copy of The Smitten Kitchen Cookbook from Alfred A. Knopf Publishing, but all opinions shared are my own. Like always.
This post may contain affiliate links. Any purchases made by using these links won’t cost you any extra and helps keep my content free. These links may be Amazon links as I am part of the Amazon Associate Program.
Randi
Sunday 17th of April 2022
Made this last night to take to a friends house. It was great! Cake is dense, more like a zucchini/banana bread, lots of chocolate. I would recommend that you refrigerate cake after putting on 1/3 of chocolate, again after next third, and again after last one, before putting the top layer on and refrigerating again. The frosting is delicious. I just did swoops on the top and waited till just before we ate it to torch it. It was beautiful and tasty...lots of rave reviews. Would recommend.
Natalie Perry
Thursday 21st of April 2022
I'm glad you enjoyed it! Thanks for the tips.
Gilberto
Tuesday 15th of April 2014
Hello, I want to subscribe for this webpage to obtain most up-to-date updates, so where can i do it please assist.
binäre optionen handeln
Thursday 4th of July 2013
Are around Sound: Professional Set up Or Sauna Equity?
kesar pista
Tuesday 21st of May 2013
i plan to make this cake this weekend for my son's 5th birthday. i would like to make it (or parts) in advance (like 1-2 days), since i have lots of other food to prepare the day of. any tips on what components can be made in advance? i didn't find any suggestions in the book and i don't bake cakes often enough to have good judgment. thx
kesar pista
Wednesday 22nd of May 2013
thanks. i knew i could make the cake in advance and the ganache in advance, but i wasn't sure about that meringue-like frosting, if i would keep. would you suggest assembling the cake and frosting the day of, or can i assemble in advance and frost the day of? i would like to do as much as i can in advance, but without trial and error, i just don't know what time would do to the assembled cake. would it be better or worse for flavor and texture? also, just an fyi for you, i had gone through this cookbook first, spotted the cake, and googled for anyone who has tried it for "cook in advance instructions" and your site came up. i'm also curious about paleo too, so i'll be poking around your site ...
Natalie Perry
Tuesday 21st of May 2013
Yum! You'll love it. The cake can definitely be made ahead of time. Just wrap the layers in plastic wrap and store in the fridge. I believe the chocolate filling can, too, but let it sit at room temperature for a few hours before assembling the cake. The frosting you'll need to do the day of. Good luck!
Jennifer
Saturday 30th of March 2013
There's no cream of tartar measurement in the frosting recipe.
Natalie Perry
Saturday 30th of March 2013
Oops! Sorry about that. It should read 1/4 teaspoon of cream of tartar. I'll fix that right now.