Prepping a roast chicken for the first time is scary. It took me a few years to muster up the courage. Want to know a secret? Once you get that first time out of the way, it’s much easier! And I’ll show you all my best tricks to make this the easiest and tastiest roast chicken you’ll ever make at home!
Got your chicken? I’ve got everything lined out step by step for you with lots of photos and tips. This may look like a long process, but prepping a chicken can be done in just 10 minutes of work. Yes, for real.
The secret to getting a lot of flavor incorporated into the bird (this works for turkeys too!) is letting sit in your fridge for several hours (or overnight) to dry out the skin and give that seasoning blend time to work its way into the meat. Scroll down and I’ll give you my best tips to ensure you end up with juicy breast meat, too.

What you'll need to make the Best Roast Chicken
- Kosher or Pink Himalayan Salt
- Coarse black pepper
- Whole chicken
- Avocado oil, or other neutral, heat-safe oil
What you need to prep a roast chicken
- A pan to put the chicken on that will catch any juices. And will also fit nicely in your fridge. It won’t be the one you roast it on.
- Kitchen scissors.
- A plate or a garbage bowl for discarding the wrapping and other things.
- A small bowl with salt and pepper measured out.
How to Roast Chicken: The prep
Deep breath.
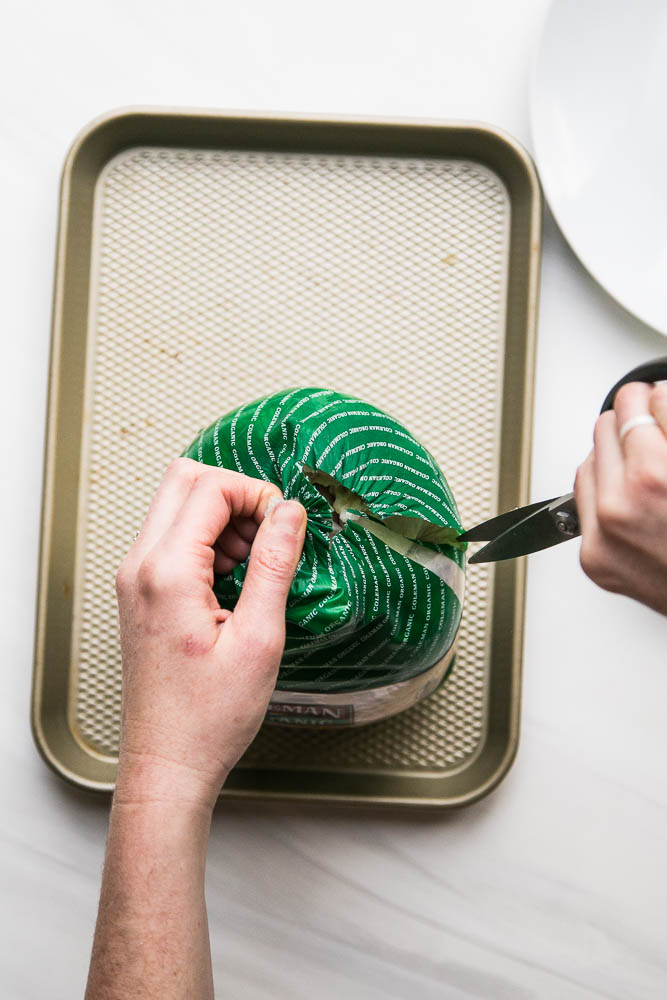
Like I said, getting the wrapping off is most of the battle.
- Ok, time to cut. I like to make a small slit in the top and then run the scissors down either the front or back of the packaging.
2. Pull the wrapping away and grab that little juice-soaked pad and get rid of that, too.
Every time I see that thing I think, “chicken maxi pad.” Sorry, if you do, too, from now on.
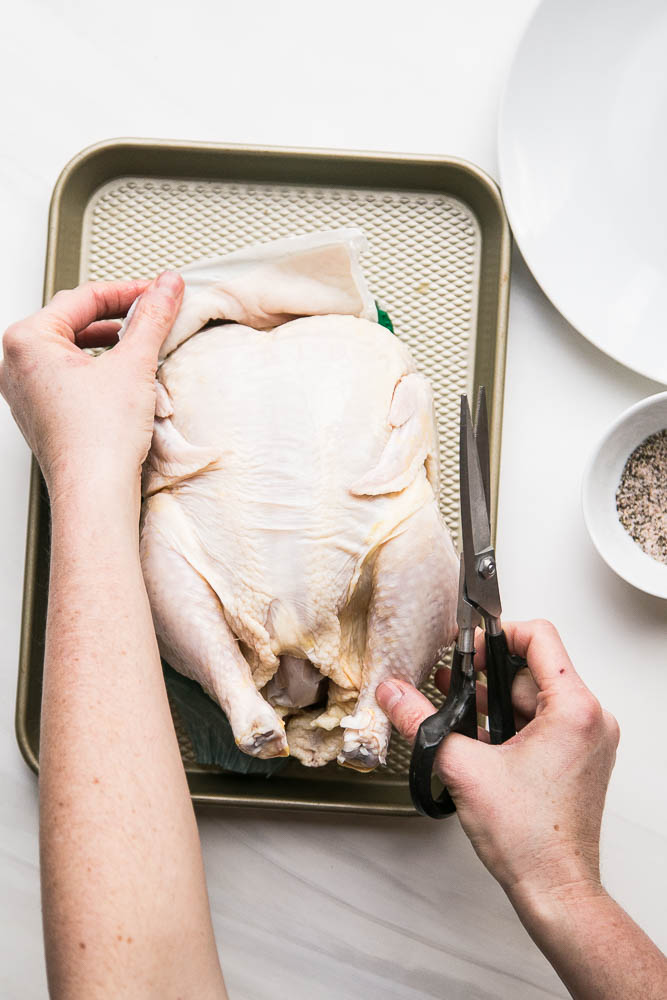
3. Peek inside and see if there’s anything inside. Sometimes the neck will be shoved inside (check both openings). Usually there will be a little pouch full of the organs.
4. Set the organ pouch aside later in a ziptop bag and put it in your fridge or freezer for when you make broth. If you don’t plan on making broth or eating them, then throw them away.
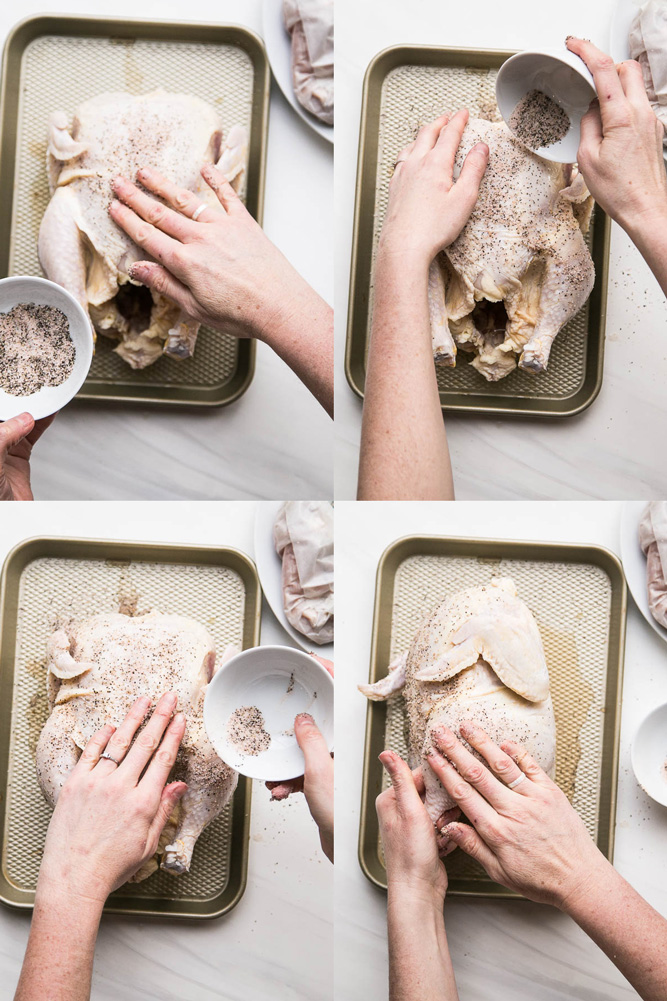
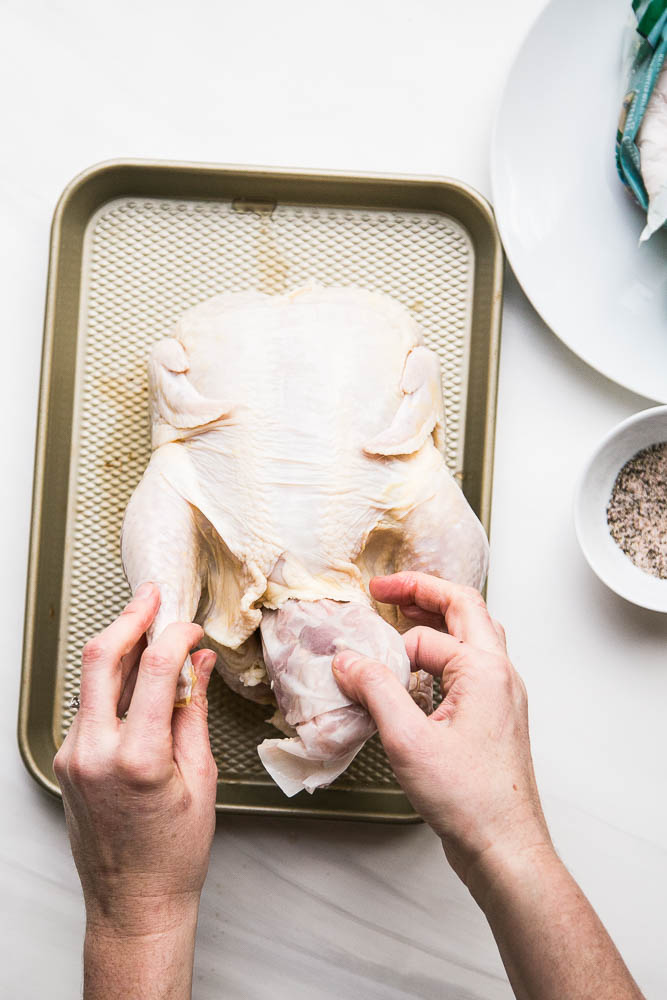
5. Now put all of that salt and pepper on the chicken. Yes, all of it. It may seem like a lot, but it has to penetrate through skin. No, you don’t have to put it under the skin.
The best salt for Roast Whole Chicken
A note about salt — Kosher salt is actually the best salt to use for this. You can also use Himalayan Pink Salt, but I think Kosher salt seasons it more evenly.
In these photos I used the pink salt, but only because I forgot and didn’t realize it until my chicken was in the oven. *facepalm*
It’s fine though, because whole chickens are pretty resilient. Either salt will work. Just don’t use regular table salt or it will be too salty.
How to Roast a Chicken: Letting the chicken rest
Ok, here’s the deal…
As much as I’ve tried, it’s nearly impossible to pull a whole chicken out of the fridge, throw some seasonings on it, cook it immediately and have the flavor be stellar.
No matter how much stuff I put under the skin or inside of it. Even if it’s in an Instant Pot. (Although an Instant Pot does a pretty decent job.)
The most important way to get flavor deep into the meat is TIME.
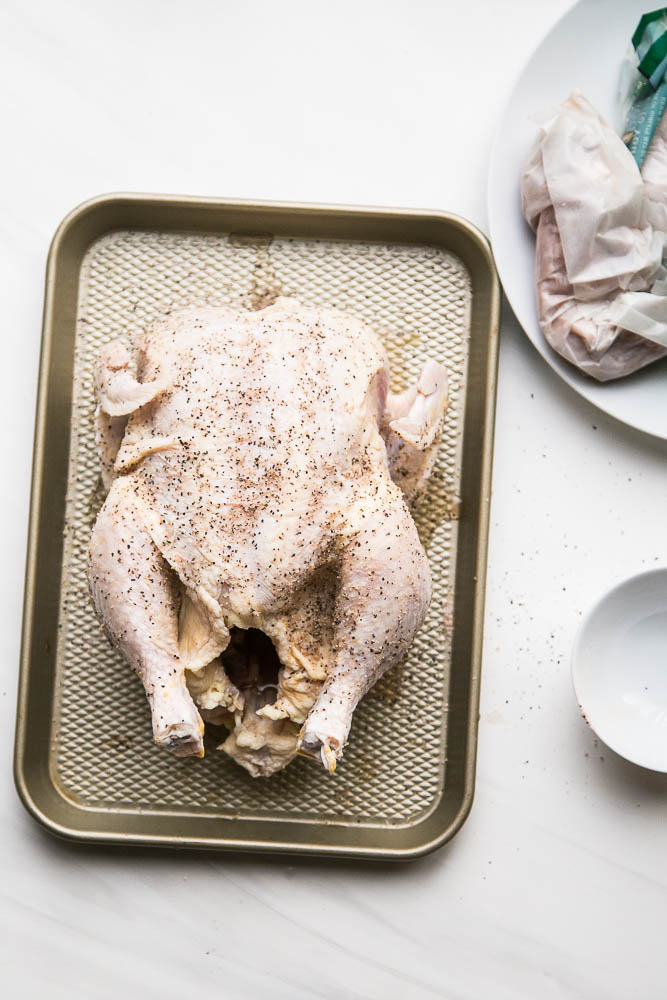
This chicken is going in to the fridge for several hours. UNCOVERED.
- Time gives the salt time to work its way deep into the chicken and season it thoroughly.
- Leaving it uncovered allows the skin to dry out completely which creates super crispy skin when it’s roasted.
You’ll need at least 5-6 hours, though. And you can leave it in there for up to 36 hours. (I did that once accidentally, and it worked out really well.)
Here's my rested chicken. Notice how the skin is more taught and thinner looking.
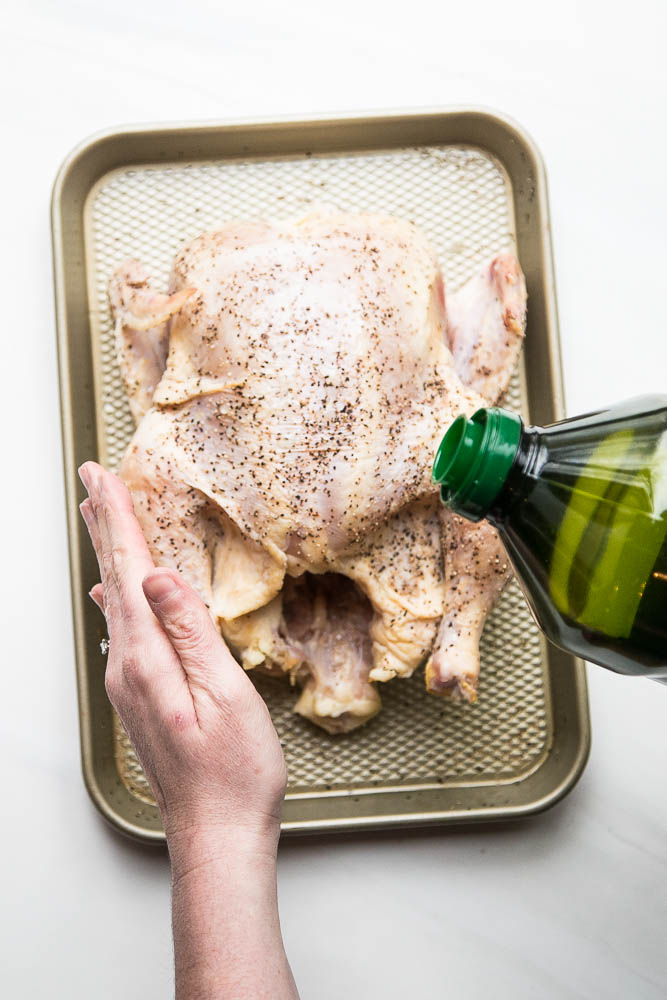
Ok, let's roast this lady.
Drizzle some oil over the chicken. I use avocado oil because it’s flavorless and has a high smoke point. You could also use light olive oil.
Best Roast Chicken Recipe Variations
Sometimes you could add a halved garlic clove or some fresh herb, sure.
BUT.
The point of this recipe is to simplify the process and get a chicken on the table in about an hour. Putting things in the cavity prolongs the cooking time and sometimes it doesn’t cook evenly because the heat can’t circulate as well.
For now, just leave it empty. :)
If you want to get a little bougie, you could slide some Homemade Garlic Herb Butter under the skin! (Check that post for a sneaky tip that leaves more butter on the chicken instead of your hands.)
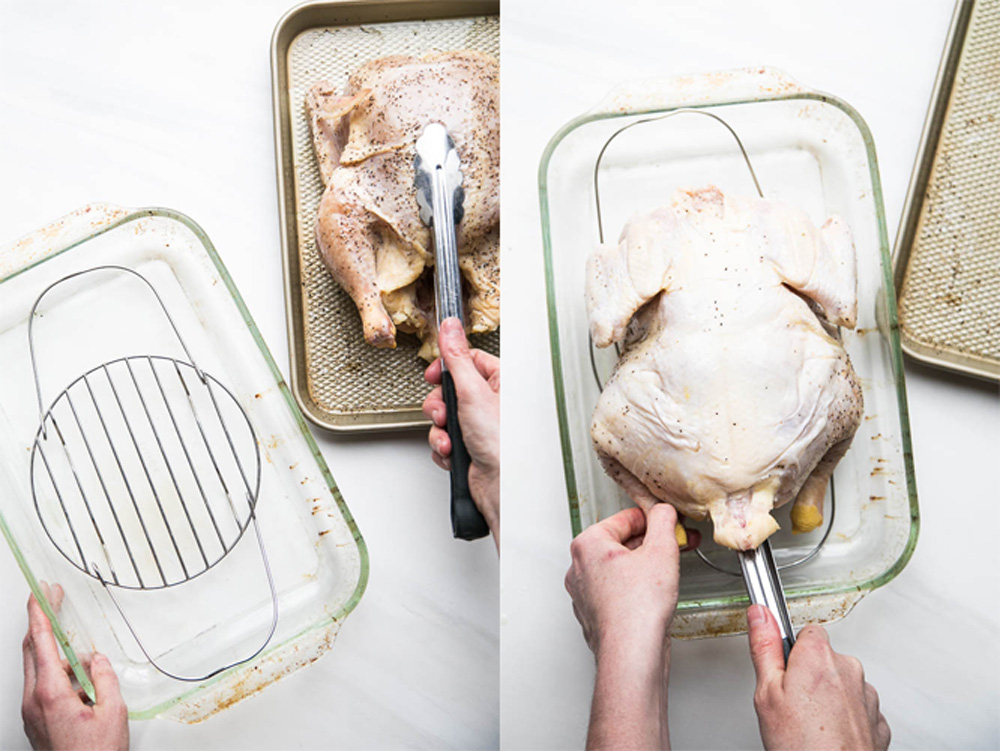
What kind of pan should I use to cook a chicken?
For the baking vessel I like something that isn’t too big because you risk burning pan juices if they’re spread really thin in a big roasting pan or cookie sheet. It’s OK to use a larger pan if you have some vegetables around the chicken, though.
I use a 9x13 glass Pyrex pan. (Well-loved as you can see, for the past 16 years.)
I also put a rack in there — the one from my Instant Pot. This isn’t necessary, but I like to have the chicken up, out of the chicken juices and it helps the heat to circulate well, too.
Ok, now put the chicken on the rack. UPSIDE DOWN.
Breast-side down, that is. For now.
Roasting chickens breast-side down for the first part of cooking lets the juices collect in the breast area. It helps those areas not dry out as quickly.
Chicken breasts are usually the first to be dry because they have a lower fat content than the dark meat areas in a chicken.

Last thing — I put a cup or so of water in the pan. Just more insurance that my pot juices won’t burn.
Ok, take it for a ride in a 450 degree oven for about 30 minutes.

Take it out and flip it over so it’s breast-side up.
Using a pair of long, sturdy tongs is good for this.
Put it back in the oven for another 25-40 minutes, depending on the size of your chicken.
An instant-read thermometer should read 160 degrees in the deepest part of the breast meat. It'll continue to cook for a few minutes after you take it out of the oven, reaching the recommended 165 degrees on its own.

Take it out of the oven and let it rest for at least 10-15 minutes before you cut it. Otherwise all of those juices you worked so hard to contain will spill out all over the platter.
Ok, thoughts? I know this is a super long post, but it’s really an easy process.
In a nutshell:
- Cover chicken with salt and pepper. Let it sit in the fridge for 5-36 hours uncovered.
- Cover with oil.
- Roast, breast-side down for 30 minutes at 450 degrees.
- Flip the chicken over and finish cooking for 25-40 minutes.
See? Not so bad, right?
There are a lot of reason why I like to roast chickens. Here are a few…
Reasons to make the Best Roast Chicken ever
- Whole chickens are more economical than buying single cuts, most of the time. Especially if you’re looking for pastured or organic chickens.
- Cooking bone-in chicken has way more potential for amazing flavor over boneless/skinless cuts. This doesn’t mean your chicken won’t end up dry. That could still happen if you overcook it — at least the breast meat.
- Your house will smell amazing.
- You can also get 3-4 quarts of bone broth out of the carcass. And if you’re buying high quality chickens you can make high quality broth/stock for MUCH cheaper than buying it at the store. When I spend $12 on an organic chicken I figure I’m buying the chicken + almost a gallon of broth along with it.
- You feel cheffy. And a little badass.
Any other questions? If you haven’t roasted your own chicken, have I convinced you to give it a try?
I hope so!
One of my favorite things is to take a chicken from roasting it whole to making broth with the bones and then making soup out of the broth and leftover meat.
I literally did that when I created this post! I’ll have Instant Pot Chicken Bone Broth and The Best Instant Pot Chicken Soup recipes for you shortly!
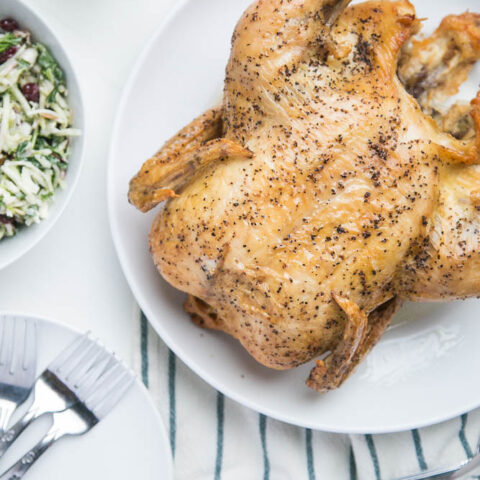
What to serve with this chicken
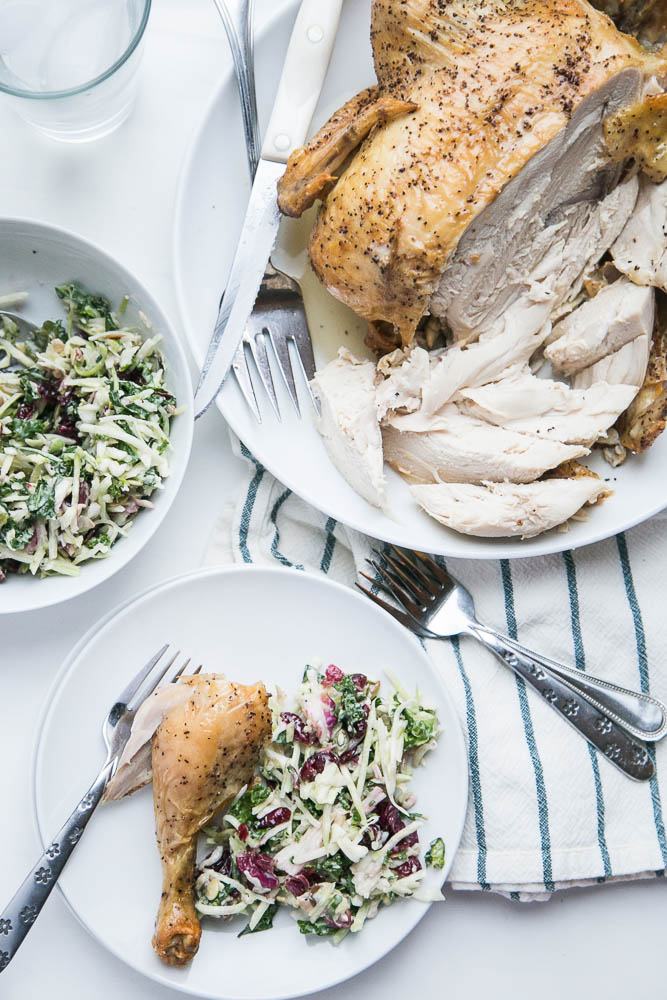
We like to pair roasted chickens with a simple salad — like the Costco Sweet Kale Salad pictured above. (The one in the photo is the actual salad kid. #Christmasbreak). Or Homemade Caesar Salad.
Or Sweet Potato Fries or some other roasted vegetables that I put on the oven rack below the chicken. Parmesan Roasted Broccoli cooks super fast that way. (Put it in there during the last 20 minutes or so of cooking.)
Instant Pot Cilantro-Lime Rice or Coconut Rice is also tasty with roast chicken.
That's the beauty of a roast chicken. So. Many. Options. for serving!
Psst... if you have a pellet grill or a smoker, try my Whole Smoked Chicken!
Best Roast Chicken Recipe FAQs
Do you need to rinse chicken?
Short answer: No.
Long answer: Older recipes suggest rinsing chickens, but modern food safety guidelines say not to anymore. Rinsing a chicken in your sink just spreads more bacteria around your kitchen. And anything that’s on the surface of the chicken is going to be cooked off into the oven anyway.
Do I need to tie the legs together when I roast a chicken?
Nope.
You can if you like, though. It looks nicer and it could potentially help the chicken cook more evenly, but I haven't noticed a difference. 99% of the time I don't.
Best Roast Chicken
After making roast chickens for over 10 years trying lots of different techniques, THIS one is the easiest. And the flavor is super stellar. PLUS, it's easy enough to make on a weeknight!
Ingredients
- 1 Tablespoon Kosher or Pink Himalayan Salt
- 1 teaspoon coarse black pepper
- 1 4-5 pound whole chicken
- 3 Tablespoons avocado oil, or other neutral, heat-safe oil
Instructions
- Measure the salt and pepper out into a small bowl. Place it on the counter where you’ll be working along with a small pan or platter to place the chicken on, another plate or garbage bowl to discard things, and a pair of kitchen scissors.
- Cut the outer wrapping off the chicken and discard it into the garbage bowl. Pull out any organ pouches neck pieces from the chicken cavity and set them in the garbage bowl for now. If your chicken doesn’t have these, don’t freak out. If you plan on making broth later, put the neck pieces and organ pouch in a ziptop pouch and into the fridge or freezer.
- Cover the whole chicken with all of the salt and pepper.
- Put the chicken, uncovered, in the refrigerator for at least 5 hours, up to 36 hours.
- When you’re ready to cook the chicken, preheat your oven to 450 degrees. Take your chicken out when you turn the oven on to give it time to warm up a bit.
- Drizzle the oil over the chicken.
Pull out your baking pan of choice. I use a 9x13” Pyrex baking dish with the rack from my Instant Pot inside. The rack is optional. - Put your chicken in the pan (on the wire rack, if using), BREAST-SIDE DOWN.
- Roast for 30 minutes. Flip the chicken over, so it’s BREAST-SIDE UP.
- Roast for another 25-40 minutes or until an instant-read thermometer reads 160 in the deepest part of the breast area.
- Take the chicken out of the oven and let it rest for 10-15 minutes before slicing.
Slice and serve.

![]()
This post contains Amazon affiliate links. Purchases made by using these links don’t cost you any extra and helps to keep my content free.