Regular pie crust is daunting enough, but a gluten free crust sounds like a crumbly nightmare, doesn’t it? What if I told you I have a gluten free pie crust recipe that allows you to roll it out? Make beautiful fluted edges? A lattice??

This is the BEST Gluten Free Pie Crust
My grandma is an expert pie maker and her easy, forgiving recipe was a perfect jumping off point to make a gluten free pie crust that doesn’t make you want to stab your eyes out. AND tastes good.

Gluten Free Crust Recipe Ingredients
- Gluten-free flour blend - I like mixing up brown rice flour, potato starch and tapioca flour/starch. Mix thoroughly and store the remaining flour blend in an airtight container at room temperature. Use 1:1 in any recipe that calls for all-purpose flour.
- Sea salt
- Cold butter or vegan butter - I like the taste of Kerrygold grass-fed butter and for a dairy-free version, I liked Earth Balance vegan butter sticks
- Egg
And that reminds me — yes, I use cold butter. You can probably use palm shortening for a dairy free option, but I make no promises about the outcome. I use Kerrygold grass-fed butter because it tastes amazing. And because, butter.
Best Gluten Free Flour for GF Pie Crust
The flour I used is an adapted version of the King Arthur Gluten-Free Brown Rice Flour Blend Recipe.
IMPORTANT NOTE: If you try this recipe with other gluten free flour blends, I can't guarantee it will turn out well. Also, this recipe will not work with almond flour, cassava flour, or coconut flour.
Since the website with the recipe isn’t online anymore, here’s the recipe:
King Arthur Flour Blend for this Gluten Free Pie Crust Recipe
- 3 cups brown rice flour
- 1 cup potato starch
- ½ cup tapioca flour/starch
I’ve been using this gluten-free flour mixture a lot lately, and it’s my current favorite. The ingredients are all easy to find, especially if you have a grocery store with a bulk section.
(If you are baking for someone with severe gluten allergies, then bulk bins aren’t a great idea because the risk of cross-contamination is higher.)

How to make Gluten-Free Pie Crust
While you could use a pastry blender, pastry cutter, or a couple forks, I highly recommend using a food processor!

1.Just toss that flour and salt into the work bowl, give it a buzz, and then drop pieces of butter in and pulse it up.
Leave some larger chunks of butter in there and don't blend it too much.
2.Here’s the important part. Have a big glass of ice water ready, and measure out ¼ cup of the water. Break an egg into it and beat it with a fork.

Ice water is super important here. Keeping that butter chilled as long as possible is important no matter what pie crust recipe you’re using.
3.Then pour it into the dry ingredients and pulse some more.
4.Keep pulsing. It’ll start to get chunkier and form pea sized clumps.

And chunkier…
Until the dough starts to gather to one side of the processor in a big clump.

How to Roll Out Gluten Free Pie Dough
Empty the dough out onto a floured surface, split it in half, and shape it into two disks.
Cover them with plastic wrap and chill for about 30-40 minutes. You want the dough to be cool to the touch, but not hard.

Now we move to my countertop with the ugly sand-colored formica. Sigh.
Flour the surface and use a rolling pin to gently roll out the dough. Move from the center of the dough out toward the sides in all directions. You'll want to work quickly, too, because as the dough warms up to room temperature it'll be more difficult to work with.

If you happen to have a pastry scraper you’re in good shape. You can also use a metal spatula.
TIP: Laying a piece of parchment paper or plastic wrap on the counter makes it much easier to transfer the rolled dough to a pie plate.
I like using glass pie plates because you can invert it on the rolled out pie crust dough and see exactly how much you need to roll out your dough.

Slide it around the edges of the crust to release it from the counter and then gently transfer it to a pie plate.

Boom.
Sometimes it will tear a little, but just pinch it back together.

Trim the edges if there’s more than ½ inch hanging off the plate and then tuck the edges under to clean it up.
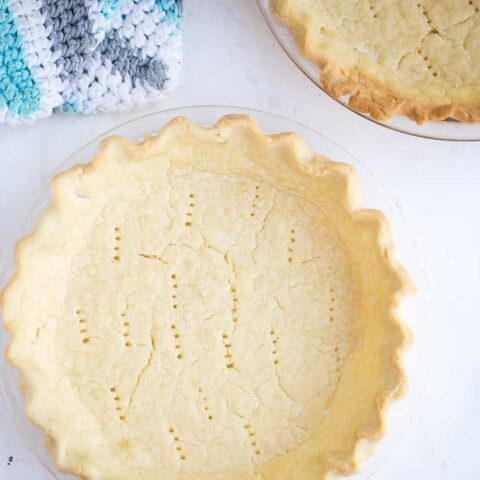
I like to crimp the edges with my knuckle because Grandma always crimps hers, and I think it looks prettier than using a fork around the edges which also flattens it and make it burn more easily.

Gluten Free Pie Crust Recipe for Single or Double Crust Pies
Did I mention this recipe makes a double-crust pie? Or two single-crust pies.
At this point you can add your pie filling to the bottom crust and bake it like normal! Or use it to make a double crust pie.
How to Blind Bake or Pre-Bake a Gluten-Free Pie Crust
If you’re going to pre-bake it, prick the bottom of the crust with a fork so it doesn’t bubble, cover with parchment or foil and add some pie weights or dry beans. Then toss it in a 400 degree oven until golden brown — maybe 15-20 minutes.
Remove the foil halfway through baking to get it a nice light golden color.

I don’t have pie beads, weights, or dry beans so I just lightly press foil onto the crust and cover the edges.

Ready to be filled!


How to store Gluten Free Pie Crust Dough
If you'd rather make your pie crust ahead of time, here are a few ways you can freeze it:
1. How to freeze Raw & Unrolled Gluten Free Pie Dough
The step where you form the dough into a slightly flattened disk? Instead of putting it in the fridge, wrap it again with some foil and stick it in a freezer bag. You can fit several crusts in a gallon bag, so this way saves a lot of space. Lasts a couple months in the freezer.
TO USE: Let it thaw for several hours -- the last couple of hours can be room temperature. It should be somewhat chilled when you roll it out.
2. How to freeze raw & rolled out gluten free pie crust
This option works whether you plan to pre-bake your crusts or not. Roll it out and form it in a freezer-safe pie plate. Cover the whole thing with plastic wrap and a layer of foil and then freeze. I wouldn't leave this in the refrigerator for more than a week because it has a higher chance of drying out since it's already rolled out.
TO USE: Thaw it out (but at least keep it chilled -- room temperature is like death to a pie crust) and either pre-bake it or fill it and then bake. This probably goes without saying, but DON'T put frozen Pyrex dishes in a hot oven unless you plan on making a broken glass/pie dough mosaic art piece.
3. How to store baked gluten-free pie crust
Wait until the crust cools, wrap it in plastic wrap and foil and freeze for up to a week. Honestly, I probably wouldn't do this unless I was REALLY pressed for time for Thanksgiving pie making on the actual holiday because the pie crust could dry out really easily and you may run the risk of breaking it while trying to wrap it.
TO USE: Let it thaw somewhat so it isn't icy when you add your filling.
Here are a few recipes on my site that use this delicious Gluten-Free Pie Crust recipe!
How to use this GF Pie Crust Recipe
Grandma Inez's Pineapple Pie is at the top of this list. It's my favorite pie in the whole world. If you've never had it, it's like a pineapple version of lemon meringue.
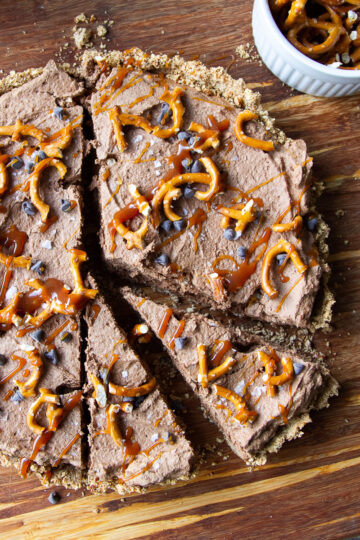
Cleaned-up Chocolate Silk Pie was mentioned above. It's a rich, decadent chocolate silk pie that's naturally sweetened and the only dairy is grass-fed butter!
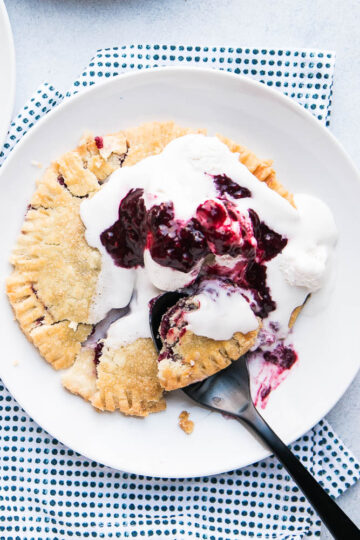
Gluten-Free Berry Hand Pies use my Easy Berry Sauce to make the cutest hand-held pies! The Easy Berry Sauce can also be used as a mixed berry pie filling (see recipe notes)
I filled one with this Cleaned-Up Chocolate Silk. You may want to get in on this. It's a naturally sweetened chocolate silk pie and the only dairy is grass-fed butter. It's rich and decadent and delicious.
Obviously this recipe works beautifully for sweet pies This gluten free pie crust works well for savory pies, too! It makes a delicious top crust for a chicken pot pie.
More Recipes on Perry's Plate
If you make one of my recipes, I'd love to see! Post it on social media and tag me at @perrysplate or #perrysplate so I can send you some love!
Frequently Asked Questions
Yes! After trying different non-dairy options for the butter, I got the best results from using Earth Balance vegan butter sticks. Miyoko's vegan butter and straight palm shortening work well, too.
Vegan butter has better flavor than palm shortening, though. Straight coconut oil was the most difficult to work with and gave the crust a pronounced coconut flavor which might not work, depending on the type of pie you're making.
If you're using vegan butter make sure to use the stick form instead of the tubs since the fat/water content differs and will affect the outcome of your pie crust.
Without gluten, bread dough lacks elasticity and the "stickiness" needed to hold together. The use of an egg in this crust means your crust will hold it’s form better than some other recipes! Other binders include ingredients such as potato starch, tapioca and xanthan gum.
Don’t overmix your pastry! Only pulse the mixture together until the dough starts to gather to one side of the processor in a big clump.
This recipe only takes ±18 minutes to bake blind. Gluten-free flour can take longer to bake, so always follow the recipe and keep an eye on the pastry. You will want to pull it out the oven once the crust is baked through, but not too browned.
Best Gluten-Free Pie Crust Recipe
This is the best gluten-free pie crust I've ever eaten. It's also fairly easy to work with. Just be sure you use the gluten-free flour blend I recommend in the notes!
Ingredients
- 2 cups gluten-free flour blend (recipe in Notes)
- ½ teaspoon sea salt
- 12 Tablespoons cold butter (grass-fed, if possible)
- 1 egg
Instructions
- Fill a tall glass with ice water and set it aside.
- Combine the flour and salt in the work bowl of a food processor. Pulse to combine.
- Cut the butter into ½-inch pieces, and add them to the food processor 2-3 pieces of the time and pulse a few times in between additions. The mixture should resemble coarse damp sand. Don't overmix it.
- Measure out ¼ cup of the ice water into a small bowl. Crack the egg into the water and beat it with a fork.
- Pour the egg mixture into the processor slowly while pulsing. Continue to pulse the crust until it gradually thickens and gathers to one side of the mixing bowl.
- Transfer the dough to the countertop and gather it into one ball. Cut it in half and form each half into a disk. Cover the disks with plastic wrap and chill for 45-60 min (or put it in the freezer for 20 minutes).
- Place the chilled disk on a floured surface and gentle roll it out working from the middle outward. If the crust cracks, just pinch it back together. Roll it out to the desired size -- I like to turn the pie plate I'm using upside down to make sure the crust is big enough.
- Using a pastry scraper or a metal spatula, loosen the edges and work your way into the center to release it from the work surface. Transfer it to a pie plate.
- If there is any crust that hangs over the edge of the plate more than about ½-inch, trim it off. Tuck the edges under and crimp them if you want.
- At this point you can fill the crust and bake it. If you want to pre-bake it, prick the base of the crust with a fork and press a piece of foil over the crust, covering the edges.
- Bake the crust at 425 degrees F for 12 minutes. Remove the foil and continue to bake for another 6-8 minutes until the crust is baked through, but not too browned.
Notes
Recommended Gluten-Free Flour Blend:
3 cups brown rice flour, 1 cup potato starch, ½ cup tapioca flour/starch. Mix thoroughly and store the remaining flour blend in an airtight container at room temperature. Use 1:1 in any recipe that calls for all-purpose flour. Works especially well for pancakes, waffles, and crepes.
- If you don't have a food processor, you can use a pastry blender or a couple of forks to cut the butter into the flour and make the dough.
- You can store the dough disks and the pre-baked crusts in the fridge, covered, for up to a week.
Nutrition Information
Yield 12 Serving Size 1Amount Per Serving Calories 184Total Fat 12gSaturated Fat 7gTrans Fat 0gUnsaturated Fat 4gCholesterol 46mgSodium 186mgCarbohydrates 16gFiber 1gSugar 0gProtein 3g
The information shown is an estimate provided by an online nutrition calculator. It should not be considered a substitute for a professional nutritionist’s advice.
This post may contain affiliate links. Any purchases made by using these links won't cost you any extra and helps keep my content free. These links may be Amazon links as I am part of the Amazon Associate Program.